What is Honing?

Honing Process | Multi Pass Honing | Single Pass Honing

Honing is an abrasive machining process that imparts precision surface to a work-piece, generally meaning the process of finishing of holes with precision geometric form and surface finish.

Although there is the terminology of Flat Surface Honing (which we shall ignore for the purpose of this article), in general Honing refers to finishing holes in terms of final sizing and creating desired surface finish pattern on the interior surface of holes in a work-piece.
‘Final sizing’ refers to producing holes with precision geometric form i.e., controlled diameter, circularity & cylindricity.

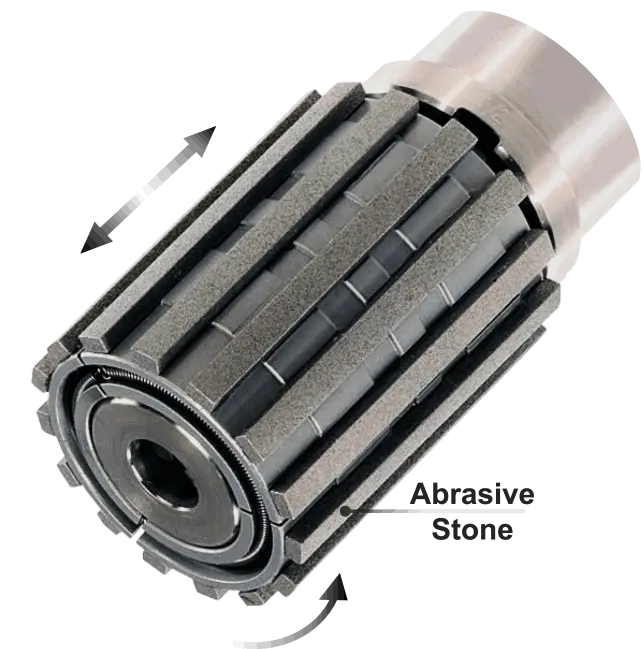
‘Machining’ process takes place by the mechanism of abrasive scrubbing & micro-grooving – accomplished by a tool that radially expands abrasive stones striped to it.
Grit size & grade of the abrasive stones influence the level of form control and surface roughness generated. The tool (more aptly the abrasive stones) are rotated and reciprocated in the work-piece (hole) with controlled radial-expansion pressure given to the stones.
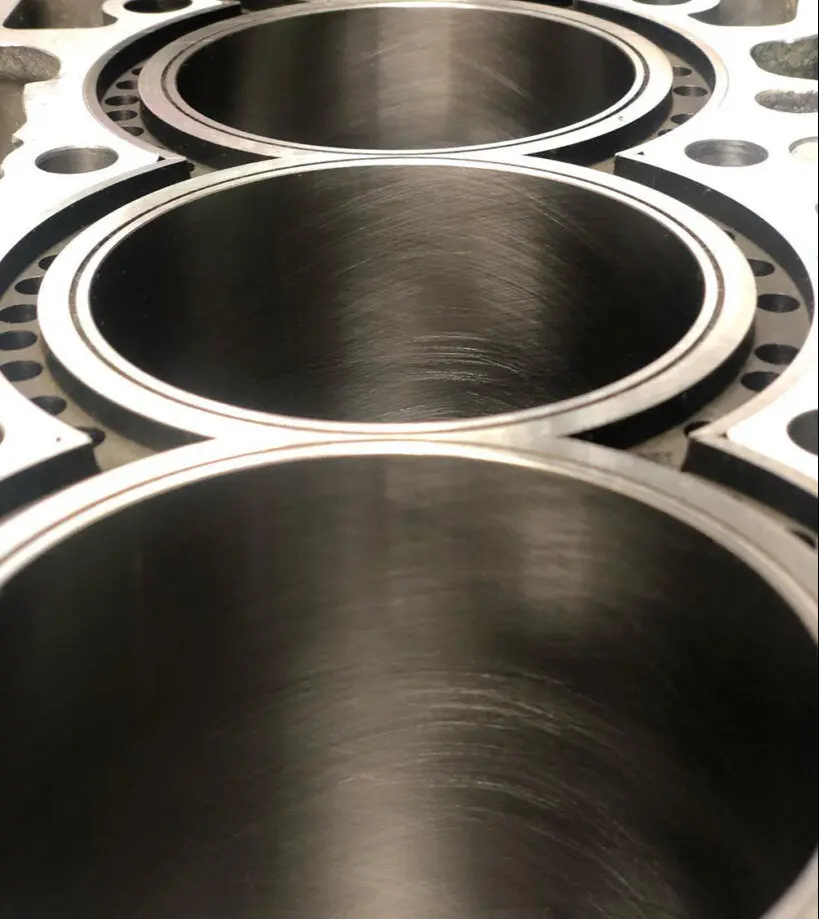
This combined motion (rotation & reciprocation) generates a cross-hatch pattern on the interior surface of the work-piece.

Input hole size of the work-piece is generally pre-machined by way of boring or reaming, to achieve a certain level of consistency in amount of material removed and to enhance honing tool life. 

From the point of view of precision manufacturing, in-depth comprehension of quality requirements of the work-pieces, core principles of surface structure formation, and right applications of honing  - enable sustainable manufacturing of high-quality finished products in industries like automotive, aerospace, medical, and so many others. By effectively leveraging the schematics, capabilities & benefits of honing, manufacturers can produce precise and efficient components & products - that meet the demands of modern engineering.
Single Pass Honing, Single Stroke Honing, Diamond Reaming, Multi-pass Honing

Define Honing

Inferring from from VDI 3220

Honing is the machining process where multi-edged tool coated with abrasive particles is used; And the tool with a continuous surface contact with the work-piece, does the job of optimizing the dimension, form & surface of pre-machined work-pieces.

Between the tool and the workpiece - a change in direction of movement takes place - longitudinally i.e., the tool or the work-piece or both - reciprocate(s) in axial direction. Either or both the tool & work-piece may be rotating. Therefore - the finished surfaces are characterised by a cross-hatch pattern on the honed surface.

In simpler terms, to visualize honing - imagine a combination of drilling & grinding-
- Just like a drill remains in full circumferential contact with the work-piece (i.e., drill's OD surface and ID surface of the hole being drilled - are in continuous contact), the honing tool remains in complete circumferential contact with the hole being honed.
- And then, like a grinding wheel abrades the material, abrasive grains coated to the honing tool abrade the material away.
- Now imagine this imaginary drill with coated abrasives - is reciprocating axially, and there you have fundamental kinematics of Honing.

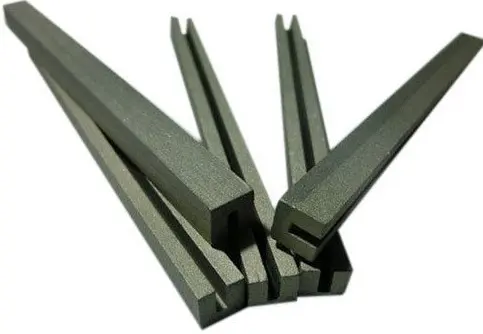
In practice - abrasives are made like stones or more aptly like sticks. Abrasive particles, in a granulated form of a specific grit size - are held together by a bond - to form an abrasive stick.

The grit size and concentration of grains per unit surface area determine:
- Stock removal capacity of the honing stone
- Achievable surface structure on the work-piece

Bigger the grit size - higher the stock removal and rougher the surface finish.

We'll see this in a little more detail in the topic as under.

Honing Stones

Honing Tool


Honing Tools aka Hones

There are many types of hones, but in principle all types consist of one or more abrasive stones that are held together radially under pressure against the surface they are working on

Each abrasive stone is made up of abrasive grains that are bound together with an adhesive or a bonding material. Usually, these grains are quite irregularly shaped with size of each grain from about 10 to 50 microns (~300 to 1500 grit). Smaller the grain size - smoother the surface generated on the workpiece i.e., better surface finish. The cutting angle, which is critical to the quality outcome -  ranges from 60 to 90º.

Typical abrasives used to make honing stones are corundum, silicon carbide, CBN and diamond. The choice of abrasive material is usually driven by the characteristics of the workpiece material. Corundum or silicon carbide are acceptable in most cases, but workpiece materials with high hardness – are honed using super-abrasives.

Typically the hone is rotated in the bore while being reciprocated axially (in and out of the bore). Specific class of cutting fluids with appropriate lubricity & viscosity - are used to anchor a smooth cutting action, and to remove the swarf that has been abraded.

Advances in honing tools and the abrasives - have made it possible to remove much larger amount of material than was previously possible. And hence, honing in effect has replaced grinding in many applications wherever "through machining" is required.

Just the way hole-honing (aka internal honing) is done, external hones perform the same function on outer diameters of shafts.

Go to the Top ▲

Honing Process Parameters

The machining speed of honing is fundamentally a consequence of two components:
1) Feed: The speed with which the tool advances axially into the work-pice; Typically ranges from 10 to 25 m/min. Also referred to as reciprocating speed, faster the Feed poorer the surface roughness gets and vice versa. Lower the feed the higher the cycle time gets. It is about finding the optima here.
2) Cutting Speed: the circumferential speed of the tool OD or more aptly the speed of relative motion between the tool & the work-piece surfaces; Typically ranges from 15 to 60 m/min. For faster material removal - speed is kept on the lower end of the spectrum and for better surface finish - the speed is set higher. In practice - it is about striking a balance.
Specific setting of Feed & Speed, are arrived at by carefully considering work-piece material, bore size, bore length, stock removal, tool-abrasive type, its grit, concentration, and most importantly - the desired geometric & dimensional tolerances on the work-piece.

Abrasive Selection
The honing operation highly depends on the Abrasive particles used. The choice of Abrasive depends on the hardness of the workpiece and the surface finish desired.
For very hard workpieces diamond is used as a tool.

Reciprocating Speed
The reciprocating speed of the tool w.r.t to the workpiece affects the surface finish of the job.
Higher reciprocating speeds result in the poor surface finish of the job.

Honing Pressure
As mentioned above the honing pressure ranges from 1000kPa to 2500kPa.
Lower honing pressure results in low material removal and higher pressure results in poor surface finish.

Cutting Forces
Amount of material removed or the MRR is directly proportional how much pressure is applied to the work-piece surface by expanding the abrasive stones outward (in case of a bore). Typically this radially outward pressure ranges from 1000kPa to 2500kPa. However, it can be outside this range too i.e., for extremely large grit size (smaller abrasive grains), pressure may have to be lesser than 1000kPa and on the other extreme - it can be greater than 2500kPa. It really depends on the application per se.
Lower honing pressure results in lower material removal, but better surface finish. And higher pressure results in poorer surface roughness, but faster material removal. A honing cycle can be set to make use of best of both.

Tool Engagement
And then the way in which tool engages with the work-piece and advances into axially, influence the outcome in terms of bore cylindricity.
Starting and ending positions of the reciprocating stroke must be adjusted in such a way that 2/3rd of the honing stone is always in contact with the bore. And in turn 1/3rd of the honing stone must be protruding out of the bore - in both cases (i) at the start of stroke (ii) at the end of stroke. This implies: Stroke Length = (Length of Bore - 1/3 Length of Honing Stone). Well, this is applicable for through bores.

How about blind bores then? Principle remains same. But herein specially designed honing tools engage with the the work-piece with a stroke-delay at the blind-end of the bore. This stroke delay is also sort of called as secondary honing.

Go to the Top ▲

Typical Characteristics of Honing Process

- Honing is a low-velocity multi-tool-point engagement process
- It is highly accurate in terms of generating close size & form tolerances - as low as 0.0005 ~ 0.001mm.
- It corrects the roundness and cylindricity to extremely close tolerances, going as low as 0.0005mm.
- Honing process nearly maintains the pre-machined center-line (axis) of the bore. Other finishing processes may disturb or change the axis of the bore.
- Multi-stroke honing generates a cross-hatched surface on the workpiece, which helps in retaining lubricants in the end-use.
- Wide application areas - both hard and soft work-piece materials can be honed - and a wide array of molecular structures can be comfortably honed.

Steps in Honing Process

- The work-piece is loaded onto the Fixtures mounted on the machine table, and is either clamped or left floating with sufficient arrest of DOFs
- Appropriate honing tool is affixed to the spindle and its stability is verified.
- The operator selects the process parameters viz., feed, speed, pressure, number of strokes, and so forth.
- When the cycle starts, the tool advances into the hole and expands radially outwards.
- Cutting forces act in two ways; (i) Lateral: Radial & Tangential to the bore diameter (ii) Axial:  Along the direction of axis of the bore.
- All forces are localized at each cutting edge (abrasive grain in contact with the work-piece surface).
- First occurrence is breakage of peaks on the surface of the work-piece, once the tool and work-piece contact.
- Following that, and more so simultaneously - cutting action takes place due to the abrasive stones - by way of micro-grooving & abrasion.
- As the machining nears the end, size, form and surface finish - are generated on the work-piece.
- During the process, coolant is flushed to significantly minimize overheating of the surface, and to remove the chips/swarf generated.
- Once the honing process is completed, the tool is retracted out of the hole, and the expansion pressure is released; Abrasive stones are immediately pulled inwards by peripheral spring.
- The work-piece is then de-clamped and in case of floating fixtures - simple removed off the fixtures.
- Finished part is now ready. And the cycle repeats all over again.

Go to the Top ▲

Honing Machines

Honing machines are typically made up of rotational & reciprocating mechanisms viz., a Z-axis for tool reciprocation, and rotational spindle(s) for the tool or work-piece or both, and an expansion-collapse mechanism for the abrasive stones.
In principle, a Honing Machine at its core is - a set of mechanisms for abrading material in the work-piece - utilizing hard tooling and consumable abrasives stones for the correction of:
- Size: Diameter
- Form: Circularity & Cylindricity
- Surface roughness

When mechanical devices such as pumps, engines, compressors, etc., were developed, and over time – efficiency of these devices became a key aspect of performance, it became increasingly necessary to find a way to perfect the geometries of bores, control size, achieve fine surface finish and to attain intended surface structure. This need paved the way for the development of Honing as a process of final finishing. And as the process matured, so did the the way this process was executed – in effect triggering development of reliable Honing Machines.

Types of Honing Machine
Two elementary types of honing machines-
1) Vertical Honing machine
2) Horizontal Honing machine

The construction of a honing machine is quite similar to typical a drilling machine. Working kinematics of the machine is as simple as - the tool must rotate and move parallel to the axis of the hole.

Three Functions performed by Honing Machines

1) Stock removal: Hone removes surface irregularities (peaks & valleys) and approaches nearness of a clean geometric form
2) Surface topology: A surface finish pattern is generated to create micro-pockets that enhance retention of lubricants.
3) Geometric form: Honing generates highly accurate roundness (circularity), straightness (cylindricity in a way), and diameter. 

Why Honing?

Compared to grinding, and other machining processes, honing provides a cost effective method for:
> Removing stock for nearness of ideal gometric form
> Tight & consistent bore tolerances
> Super-finishing &/or polishing of bore-surface
> Wide range of applicable materials viz., CGI, sprayed coatings, ceramics, etc., other than general engineering materials

Go to the Top ▲

Now that we’ve gone through an overview of Honing as a process, it is time to dwell into a more modern approach to Honing – the Single Pass Honing

What is Single Pass Honing?

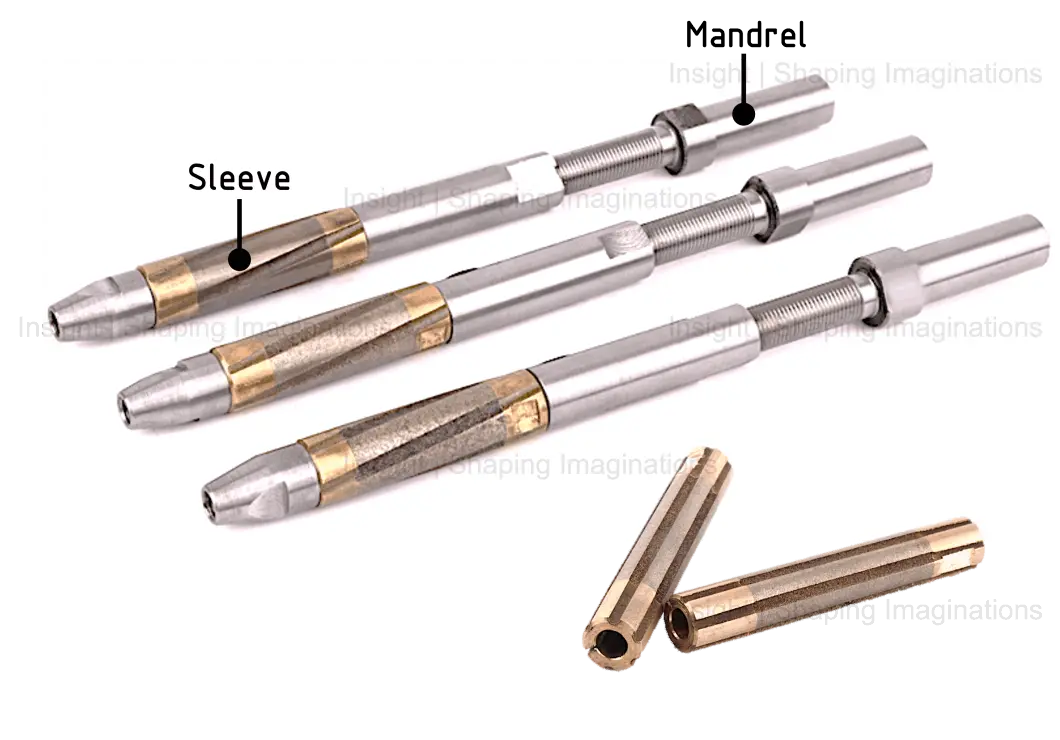
Single pass honing is done with a tool that looks like a traditional reamer. It is made up of a mandrel with a tapered front (conical) – onto which an abrasive sleeve is assembled. The abrasive sleeve itself is like a collet, which snugly fits onto the tapered front of the mandrel – which allows expansion of the sleeve radially. This expansion then translates to adjustment of the tool-diameter, which in turn results in setting of bore diameter to be honed.
Finding it difficult to visualize? Take a look here.

So, this kind of honing tool generates a straight, round and non-tapered bore with one single pass of the tool through the bore. Generally a set of such tools are used in a progressive fashion to produce a tightly controlled bore.

Components with bores such as cams, gears, connecting rods, engine crank, compressor bodies, valve bodies, rocker levers, etc., and pretty much any component with a controlled bore geometry, can be consistently and cost-effectively honed using single pass honing. Since size is achieved in one pass, there is no crosshatch pattern in the finished bore. 

Single Pass Honing

Single Pass Honing Tool

It is an adjustable tool that allows the expansion the honing sleeve or a set of abrasive stones with a tapered cone, quite similar to expansion honing tool.

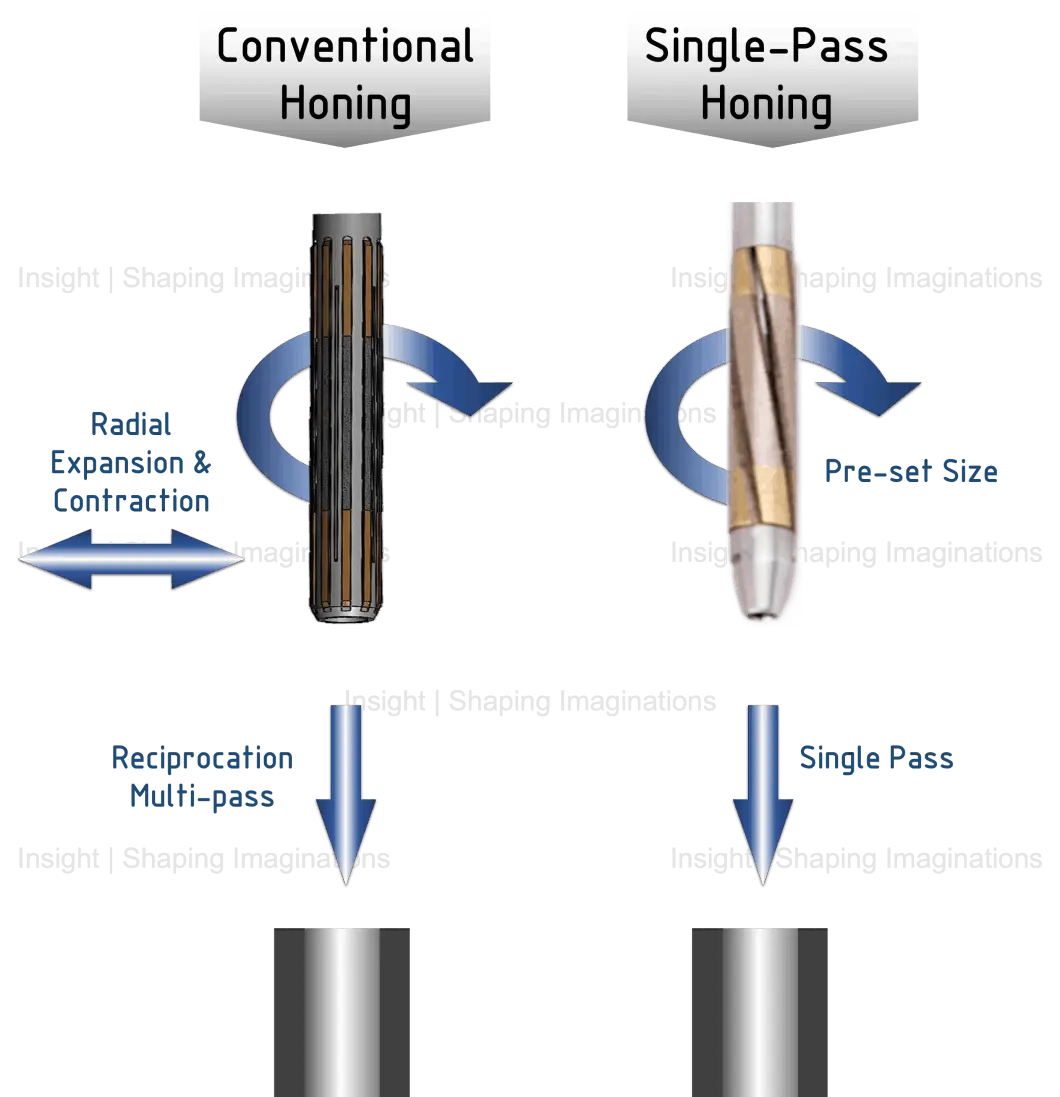
Unlike conventional honing, the sleeve in a single pass tool - is not expanded and retracted continuously. Instead the sleeve is expanded once to achieve size and left at that – for quite a large batch size of parts – running into tens of thousands at one size setting.

Also, single pass hone is longer than conventional multi-stroke hone, wherein the coated-length of super abrasive is much longer.

Since the wear-rate is much-lesser compared to conventional honing, the single pass tool has no in-process expansion of hone. Typically, after a few tens of thousands of parts, the machine is stopped to adjust the tool size. 

Go to the Top ▲

Single Pass Honing

Single Pass Honing vs. Multi-pass Honing

Conventional Multi-pass Honing is done by a tool that expands and contracts as the tool reciprocates in the bore during the honing cycle. Simultaneous radial and axial movements of the Tool, make it difficult to precisely and consistently control the bore size and geometry within shorter ranges of tolerance bands. Although conventional honing does offer excellent bore finishing, batch sizes and bore controllability are limited by the nature of the process.

Insight’s Single Pass Honing Machines, use fixed pre-set sizes of Tools, that have expandable abrasive Sleeve embedded with Diamond or CBN grit. These tools hone the bore in one pass only, removing a certain specific amount of material per Tool. With a set of Tools working on the bore progressively (each tool progressively increasing in size and finer grit size), bore size & geometry are controlled precisely and consistently, over a large batch size.
Since the tool stroke is only once in Single Pass Honing, cycle time achieved is greatly reduced, of order of 40~70% relative to conventional honing, as a function bore size and length.

Single Pass Honing, as a process is an economical process, consuming 40~60% lesser cost per piece, relative to Conventional methods.

Go to the Top ▲

Where is Single Pass Honing apt?

Also called Single Stroke Bore Finishing, it is typically chosen for the applications hovering around-

- Smaller diameters – usually within 50mm; But can be engineered for larger size in special cases
- High production volumes; Low takt times
- Need of low cost per piece
- Reduced down-time for tool change-over
- Tight control & repeatability of bore size, roundness, surface finish 

Operational aspects of Single Pass Honing

- Single Pass Honing requires the use of super-abrasive materials only, such as Diamond or CBN
- Super abrasive tooling enables low wear rate > long tool life > low cost per piece > low change-over down-times > tight dimensional repeatability
- Coolant flow rate needs to be sufficiently high to quickly & effectively remove the chips as they are produced - from the honing area
- Typically Oil based coolants are preferred, although water-base coolants may be used for Single Pass honing 

Process application aspects of Single Pass Honing

The size and volume of chips removed from the work-piece – must be no greater than the clearance between the abrasive grits on the tool sleeve. In view, Single Pass honing is ideally suited for honing operations that generate relatively small amount of chips - such as short length bores or interrupted cuts. Although it is mostly employed on work-pieces of cast iron and powdered metals, it has been very successful in a variety of materials that can be machined with CBN or Diamond.

In contrast, the applications that require a long bore length to be honed, or smaller production quantities &/or where a lot of material needs to be removed, are not the best suited for Single Pass Honing process. They may instead be best done using conventional Multi-pass Honing. Conventional Honing also does provide pretty good geometric control for such types of applications where it’s apt. 

Why Single Pass Honing Machines?

Insight’s iHone VR-S Series – the line up of Single Pass Honing Machines does the job for a variety of precision bore finishing applications. Modular design & architecture of iHones allows configurations from featuring a single spindle for low-volume production requirements, to machines with multiple spindles to attain high volume production needs. iHones are engineered for minimal to near-zero maintenance needs, and the modular architecture greatly decreases the set-up and the changeover time for different parts. 

Go to the Top ▲

Click to explore iHone VR-S Series - Single Pass Honing Machines.

Click to delve deeper into Single Pass Honing Process.